
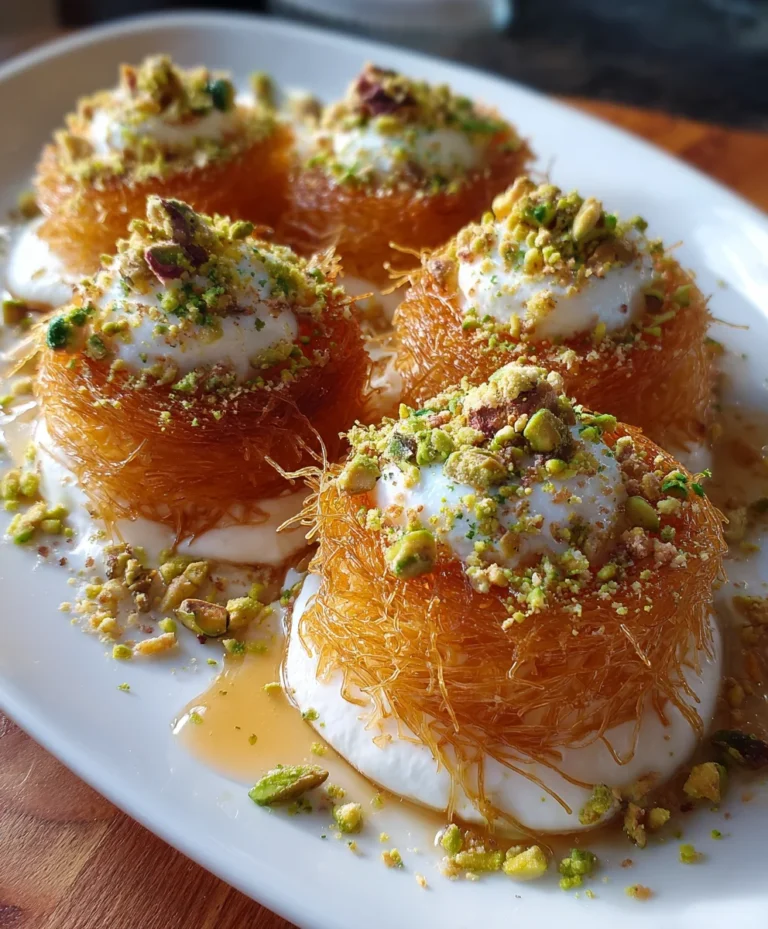
Introduction to Mini Kunafa Nests with Cream and Pistachios
Ah, the joys of being a busy mom or a professional woman! Balancing family, work, and everything in between is no small feat. That’s why I’m excited to share this irresistible recipe for Mini Kunafa Nests with Cream and Pistachios. These delightful little nests are not just stunning; they also offer a creamy, dreamy flavor that’s sure to impress. Whether you need a sweet treat for a quick gathering or a comforting dessert for a calm evening at home, these nests are here to bring joy. Trust me, you’re going to love making them!
Why You’ll Love This Mini Kunafa Nests with Cream and Pistachios
Imagine a dessert that’s quick to prepare yet looks so elegant it steals the show. Mini Kunafa Nests with Cream and Pistachios check all the boxes. They’re simple enough for an everyday treat but fancy enough for special occasions. Plus, the combination of creamy filling and crunchy kunafa is downright addictive! A lovely blend of textures and flavors, these nests are a guilt-free indulgence perfect for busy days.
Ingredients for Mini Kunafa Nests with Cream and Pistachios
Creating these Mini Kunafa Nests with Cream and Pistachios is a delightful adventure! Here’s what you’ll need:
- Kunafa dough (kataifi): This shredded pastry is the star, providing crispiness and structure to our nests.
- Ghee or melted butter: Adds rich flavor and helps achieve that golden-brown color we all love.
- Powdered sugar: Optional, this is for a touch of sweetness and extra crunch in the nests.
- Whole milk: Forms the base for our creamy filling and gives that satisfying texture.
- Cornstarch: Thickens the cream to a delightful pudding consistency.
- All-purpose flour: Helps stabilize the mixture, adding to its creaminess.
- Sugar: Sweetens the filling and balances the flavors perfectly.
- Rose water or orange blossom water: These fragrant waters elevate the dish, giving it that authentic Middle Eastern flair.
- Cold heavy cream: Optional, but it truly amplifies the silkiness of the filling.
- Whipped cream: A fluffy topping that adds lightness and sweetness to your nests.
- Mascarpone or cream cheese: This adds a luxurious texture and richness to the filling.
- Vanilla: Enhances all the flavors, adding warmth and depth.
- Sugar: For the syrup to drizzle over the nests; it adds sweetness and a bit of moisture.
- Water: Needed to create the syrup; it helps dissolve the sugar.
- Lemon juice: Brightens the syrup and balances out the sweetness.
- Crushed pistachios: These not only add a crunchy topping but also a beautiful splash of green color.
- Ground cinnamon: An optional sprinkle that can add warmth and spice to the nests.
- Extra syrup drizzle: For a touch of sweetness, served atop each nest if desired.
For exact measurements, check the end of the article where you can easily print the recipe. Let’s gather these goodies and dive into the creation of your delicious nests!

How to Make Mini Kunafa Nests with Cream and Pistachios
Prepare the Syrup
Let’s kick things off by making the syrup. In a pot, combine sugar and water using equal parts. Bring it to a gentle boil, allowing the sugar to dissolve fully. Stir occasionally to keep things smooth. After boiling for about 5–7 minutes, the mixture will thicken slightly. Now, add in the lemon juice along with the fragrant rose water or orange blossom water. This step is key to achieving that lovely aroma! Once everything is well mixed, set it aside to cool completely. Trust me, cooling is essential for achieving that delightful crunch in every Mini Kunafa Nest!
Prepare the Kunafa Nests
Next up, let’s work on our kunafa nests. Preheat your oven to 180°C (350°F) to set the stage for baking. As your oven warms, take the kunafa dough and shred it with your hands or scissors. This will loosen the strands, giving us that airy texture we crave. Pour the melted ghee over the kunafa and mix gently to ensure every strand gets coated. For an extra crunch, sprinkle in powdered sugar if you’d like.
Grease a muffin tin to help with easy removal later. Now, take small handfuls of the coated kunafa and press them into each muffin cup, shaping them into nests. Make sure they’re not too thick for even cooking! Bake these beauties for 15–20 minutes until they turn a stunning golden color. You want that crispy texture to shine!
As soon as they come out of the oven, drizzle 1–2 teaspoons of the cold syrup into each hot nest. This will ensure they soak up that sweet goodness right away. Let them cool completely so they harden and hold their shape perfectly.
Make the Ashta (Traditional Version)
If you’re keen on a traditional touch, let’s whip up some Ashta cream! In a pot, whisk together whole milk, cornstarch, flour, and sugar until smooth. Place it over medium heat, constantly stirring until the mixture thickens to a pudding-like consistency. This might take a few minutes, so be patient! Once thickened, remove it from the heat and stir in your choice of rose water or orange blossom water. These flavors will be the heart of your cream!
For an ultra-smooth finish, fold in the cold heavy cream. This step is optional, but I promise it takes the cream to a whole new level of silkiness. Chill your Ashta mixture before piping it into the nests. The cooling process helps it firm up just right.
Make the Quick Cream (Modern Version)
Now, if you’re tight on time, don’t worry. This quick and easy cream won’t let you down! Start by whipping heavy cream until soft peaks form. Add in the mascarpone or cream cheese, along with sugar and vanilla. Beat it all together until it thickens and becomes pipeable. This modern version saves you time but still delivers that creamy goodness. Pop this whipped cream in the fridge for a brief 10 minutes to firm up just a bit.
Assemble
Finally, the moment we’ve been waiting for—assembly! Grab those beautiful kunafa nests and pipe generous swirls of your chosen cream into each one. Let your creativity shine here! Sprinkle crushed pistachios on top for that satisfying crunch and vibrant color. If you’re feeling adventurous, dust a light sprinkle of ground cinnamon. For a finishing touch, drizzle a little extra syrup over each nest if you’d like. They’re ready to be enjoyed, so dig in and share the love!
Tips for Success
- Ensure your kunafa dough is thoroughly coated with ghee for even baking.
- Cool the syrup completely before drizzling it over the nests to maintain crispiness.
- Don’t rush the baking process; a perfect golden color equals better flavor and texture.
- Feel free to experiment with flavors by adding different extracts or spices.
- Assemble the nests just before serving to keep them crisp.
Equipment Needed
- Muffin tin: Essential for shaping the kunafa nests. A silicone mold can also work as an alternative.
- Mixing bowls: You’ll need a few for combining ingredients. Any large bowl will do!
- Whisk: For smooth mixing, a hand whisk or electric mixer will save you time.
- Pot: A medium-sized pot for making the syrup and cream; a non-stick option is convenient.
- Pastry bag or zip-top bag: Perfect for piping the cream easily into the nests.
Variations
- For a chocolate twist, add cocoa powder to the cream filling for a rich flavor.
- Substitute the kunafa dough with phyllo pastry for a different texture and taste.
- Try using flavored heavy cream, such as vanilla or caramel, to enhance the overall bliss.
- For a nut-free option, replace pistachios with crushed graham crackers or coconut flakes.
- Utilize dairy-free cream alternatives like coconut whipped cream for a vegan-friendly dish.
Serving Suggestions
- Pair your Mini Kunafa Nests with a warm cup of mint tea for a refreshing contrast.
- Present them on a decorative platter, garnished with additional crushed pistachios for a pop of color.
- Serve alongside fresh berries for a vibrant and juicy side.
- They’re delightful on their own, but a drizzle of chocolate sauce adds a decadent touch!
FAQs about Mini Kunafa Nests with Cream and Pistachios
Can I make Mini Kunafa Nests ahead of time? Absolutely! You can prepare the nests in advance, then bake and fill them right before serving. Just store the baked nests in an airtight container to keep them crispy.
What if I can’t find kunafa dough? No worries! You can replace kunafa dough with phyllo pastry. Just cut it into strips, layer them in the muffin tin, and proceed with the recipe.
How can I store leftovers? If you happen to have any Mini Kunafa Nests left, store them in the fridge in an airtight container. Keep in mind that they are best enjoyed fresh to maintain their crispiness.
Can I use different nuts for topping? Yes! While pistachios are traditional, you can use chopped almonds, walnuts, or hazelnuts for a unique twist on flavor and texture.
Is this dessert suitable for a special occasion? Definitely! The stunning presentation and melt-in-your-mouth texture make Mini Kunafa Nests an impressive dessert for birthdays, holidays, or any celebration!
Final Thoughts
Making Mini Kunafa Nests with Cream and Pistachios is more than just a cooking task; it’s a delightful culinary journey. I love how these nests transform simple ingredients into a stunning dessert that brings people together. The crispy texture combined with creamy filling and a sprinkle of pistachios creates an explosion of flavors in every bite. Whether for a casual weeknight treat or a celebratory occasion, these nests will truly shine. I hope you enjoy creating them as much as I do—there’s undeniable joy in sharing sweet moments with family and friends!